Table of Contents
- When carrying out any form of electrical work it is absolutely vital that the correct tools are used. Plug wiring is no different and the following plug was wired using these tools below.
- Tools you may need:
- Let’s dive right in…
- Second Method for Terminating Flex Ends
- Frequently Asked Questions
- Product Links
1) When carrying out any form of electrical work it is absolutely vital that the correct tools are used. Plug wiring is no different and the following plug was wired using these tools below.
I will discuss each one, its uses and where to obtain them from. Links to purchasing the tools are shown at the bottom of the article.
Back to top2) Tools you may need:
The first tool is the Modulo screwdriver by C.K tools. This is available from many different online stores. This screwdriver is specifically for electrical terminals. Many modern plug tops have special screws that are designed to accept this special screwdriver specific to electrical terminals. The tip is a special design, as you can see from the photograph. It is intended to prevent damage to electrical terminals whilst allowing a good fit. It also gives the driver the ability to tighten the screw sufficiently without the head rounding off or the screwdriver tip slipping out of the screw head. This screwdriver is a VDE certified tool which is always important when working with electricity.
The next tool that is needed is the slotted screwdriver. This tool is sometimes needed for older terminals in the back of the plug top. Older plug tops had slotted screws which required the right sized slotted screwdriver. The size is a 3.5. This is also a useful tool when prising the fuse out of its holder to change it as its small enough to get in to the gap. As you can see, this tool is well used and worn although still safe for everyday use. This is a WERA branded tool which are also good quality and great for this type of work.

The next tool is really useful for stripping flex cables. The C.K wire strippers are fantastic at removing the sheath of smaller cables quickly and easily. They have fine adjustment to ensure that the insulation on the wires (conductors) underneath, is not damaged. Using a small metal dial the grip can be adjusted on this tool very easily. This tool is readily available at many stores. I have used a generic branded tool that is very similar but it did not strip the cable easily or reliably and caused no end of problems so I would definitely recommend paying that little extra for the C.K one for sure.

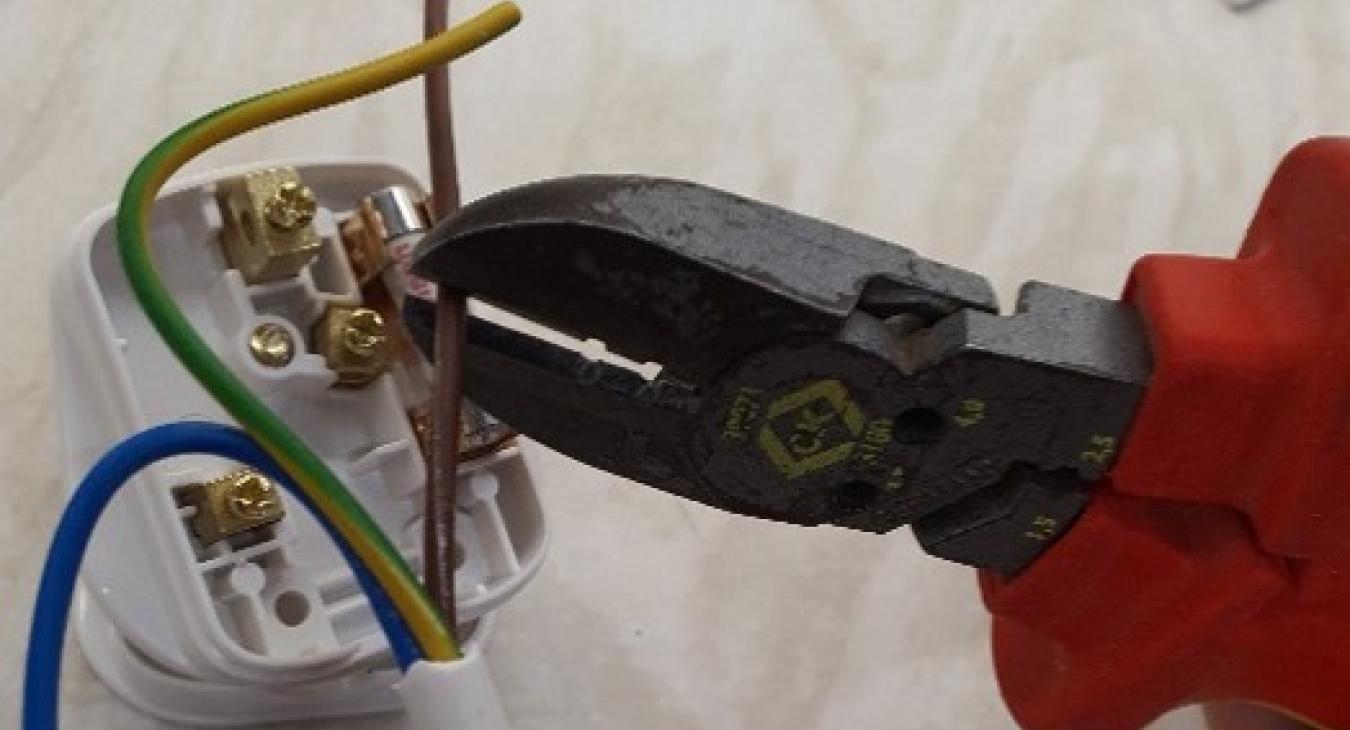
Finally, the last tool used here is the side cutters tool. This is used to cut through cables and individual wires (conductors). This is a particularly interesting set of side cutters though as they come with cutouts for 1.5 mm and 2.5 mm cable. This makes removing the insulation from these two types of cable very quick and accurate leaving no damage to the copper underneath. Also, the 1.5 mm hole will happily strip 1 mm and even 0.75 mm cables with a bit of a wrist flick so for the extra money, they are brilliant and C.K have done it again. I have not used other brands so could not comment.

3) Let’s dive right in…
3.1) Materials you will need
You will need the flexible cord of the appliance and a new plug top. You may also need a fuse of the correct size if your plug top does not come with the correct size. Most readily available plug tops come with 13-amp fuses and this will not suit all appliances so check that yours is correct before finishing the swap.
3.2) How to carry out the work, step-by step
Step 1 - Check the plug top for the instructions and familiarise yourself with the layout of the wiring inside the plug. This one is typical and all wires in these plugs will go in the same place. Check the plug top and the appliance flex for signs of damage and make sure that all the pins are in good condition and that the screws in the plug top are all present. Missing screws can lead to a loose plug and live parts becoming exposed to the touch.


Also check that the kite-mark is there to let you know that the plug has been manufactured and checked as safe. I would always advise purchasing this kind of equipment at a trusted and reputable wholesaler or store rather than online sites where possible. Certain online sites do not seem to have stringent enough checks in place to ensure that safety standards for electrical equipment have been checked and met.
Step 2 - Using the Modulo screwdriver, undo the central screw that holds the plug together, carefully retain this screw as it is needed when reassembling the plug top.


Once the screw is undone, separate the two halves of the plug top. The inside will look something similar to this.


Step 3 - Turn the plug upside down so the metal pins are facing into the air and locate the two screws at the base of the plug top that hold the cord grip in place. Remove the screws and the plastic cord grip from the plug top. Reinsert these two screws into the cord grip and set it aside as shown, we will need this later on when we have completed the Plug wiring.


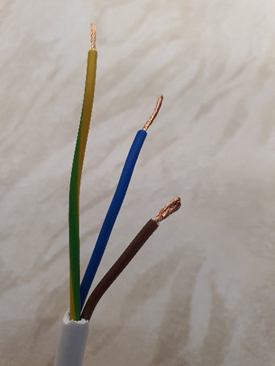
Step 4 - In this step you will need to obtain the flex cable from the appliance that requires the new plug top. Insert the flex cable into the jaws of the wire stripper tool as shown. When the cable is seated into place then squeeze the handles of the tool together until the sheath is removed. When this happens you should be able to see the coloured insulation on the conductors below. There should be no visible copper displayed or any damage to the insulation of the wiring. If there is copper displayed or visible damage to the insulation on the wiring then it is important to re strip the sheath of the flex cable. Adjust the tool so that less force is applied and no damage occurs. This tool never seems to do any damage to the wiring beneath the sheath but I have known some cheaper brands to get it wrong.


Once the sheath has been separated then pull off the loose piece of sheath detaching it from the cable. This should now leave you with the flex cable and three conductors underneath with coloured insulation showing. If you are satisfied that there is no damage then carry on to step 5.
Step 5 - Now is a good time to check that the fuse in the new plug top is of the right size for the appliance and cable that it is protecting. Check the data badge on the appliance to see what rating of fuse is required. If you know the size of the original fuse that was installed by the manufacturer then this is the size that should be used. Too small a fuse will mean the plug top overheats or the fuse blows and too large a fuse may prove to be a fire risk. Remove the existing fuse by prising it out with the screwdriver. Insert the new fuse by pressing firmly into the metal jaws as shown. The fuse should fit snugly and not rattle, rattles mean loose connections and loose connections can cause overheating or fires. If you find that the fuse is loose in the carrier you can remove it and try pressing the jaws together a little to make a more snug fit. If there is any damage then replace the plug top and begin again at step 1.


Step 6 - Offer up the wires to the plug top. This will allow you to see how long to cut each wire. Dress the wires into their approximate paths inside the plug top. The wires need to have a comfortable length to easily reach and terminate into each of their pins. Extra length beyond each pin should be left on each wire to ensure that they can be correctly terminated.

Leaving approximately 5-7 mm beyond each pin is about ideal. This means that once the cable is stripped the strands can be twisted and then folded back on themselves to create a thicker mass of copper. This slightly thicker mass is more resilient to becoming chewed up and the strands of the cable spreading in the screws of the pin connections. Once you are confident you have the length just about right then cut each of the cables.

Step 7 - Using the smallest hole on the special C.K side cutters, strip each cable of its insulation. You should strip enough insulation off that the copper can be delicately twisted and then doubled back to form a hook shape.
The photographs show how this is done, first the live is doubled back then the neutral and so on until each of the wires is suitable for insertion into their respective pin terminals. Note that each of these wires is a different length. This is as a result of following Step 6 and ensuring that each wire can take a comfortable route through the plug top and into its pin without strain.

Step 8 - It's time to loosen the terminals on each of the pins ready to accept the flex cable. Using the Modulo screwdriver undo each of the screws enough that the cable can slip into the hole. Take care not to undo the screws too much as they will fall out of the terminal and will usually go missing forever! Once the terminals are ready, Insert each of the cables one at a time and tighten then as you go. I would recommend starting with the Live (brown) wire as it is the shortest and most fiddly to get in. Then onto the Neutral wire (Blue) and finally the longest and most straightforward connection is the Earth or Circuit Protective Conductor (Yellow / Green).

The finish product should look something like the photograph below:
- There should be no real excess on any of the wires.
- The sheath of the cable (white part) should enter into the plug top just beyond where the cord grip will tighten onto the cable.
- There should be no copper showing outside of each of the terminals.
- Each of the terminals should be sufficiently tightened such that the cables cannot be pulled out.

Perform a ‘tug test’ to ensure that each of the conductors is tight in their electrical pins’ terminals. If a conductor pulls out make sure to re-terminate it with care. No screw should be so tight that damage occurs to the copper strands, this is a delicate balance to get right but with practice it becomes easier. Once you are happy that your plug top is wired correctly and is safe begin the next step.
Step 9 - Locate the cord grip from earlier. Remove the screws from this and then place the cord grip over the cables such that the protruding sections of the cord grip align with the two holes in the plug top. The cord grip protrusions should almost touch the holes once placed over the flex. Placing your thumb on the cord grip, flip the plug top over. Insert the first screw and get a couple of turns on this. Insert the second screw and partially tighten. Tighten each of the screws in turn whilst checking that the sheath of the cable has not slipped out of place. Tighten the screws sufficiently such that the cable cannot be pulled out of the plug top but not so much as to pinch the wires together inside the flex cable.

Once you have successfully managed to keep the cord grip on the sheath of the cable, tightened the screws sufficiently and kept everything in place you should have something resembling the image below. Each of the cables is neatly inserted, tightened and there is no excess of cable anywhere in the plug top. The sheath enters the plug top sufficiently to avoid damage to the single insulation on the copper wiring and there should be no problems sealing the plug top back up in the next step.

Step 10 - Locate the lid for the plug top and place it over the wiring and fuse side of the plug. Flip the plug top over so the middle screw is facing up. Using the modulo screwdriver, tighten the remaining screw until the lid is firmly in place. Take care not to over tighten this to avoid damage to the screw, plug top or your hard work underneath. Once you have completed this last step, check over the plug top to ensure that there are no gaps or cracks. If there are gaps or cracks then there may be trapped wires underneath or the screw may require further tightening. If there is a suspect gap on one side of the plug top then undo the main screw and check to make sure that no wires have become trapped whilst securing the lid onto the plug top.


4) Second Method for Terminating Flex Ends
In step 6, I mentioned that there is another method for terminating flexible stranded cables to prevent them from becoming chewed up or spreading in the screw terminations of the plug top. The other method is to create a solid end on the stranded flexible cable. One way of achieving this is through the use of a ‘ferrule’. This is a hollow tube of metal that is then attached to the end of the flexible cable. When the correct tool is used to ‘crimp’ the metal tube onto the flex, this creates a solid end that is resistant to spreading, chewing and damage from screw terminations. This does involve an extra tool and possibly a tiny trim of the tube once installed. The tool is called a ferrule crimping tool. It is available from Amazon at the time of writing. For the money, it is absolutely excellent at its job. It has served me well and is still going strong. The tool comes with a selection of ferrules in an organiser box.

In order to install the ferrule easily, I find that gently twisting the end of the flex a couple of times allows the ferrule to slip over the end quite easily before crimping is carried out.
I leave enough copper that it can poke through the end of the ferrule. This lets me know that the ferrule is full of wire and ensure I will get the best crimp connection. The photograph shows in better detail the copper poking out, the ferrule on the cable and the crimp tool in action!


Once these ferrules have been crimped in place, they should be tugged at to ensure that they cannot be pulled off. If they are correctly crimped using the right size ferrule then they absolutely will not move off the cable. It may be necessary to trim the ferrules down ever so slightly in order that the they will fit into the screw terminals. This isn’t perfect but it still creates a great connection once installed. We can see the finished product in the final photographs.


5) Frequently Asked Questions
1) How much power / wattage is okay for a 3-amp fuse?
We can work this out using the formula Current (Amps) = Power (Watts) / Voltage (Volts)
Let’s assume an appliance is rated at 460 watts of power. We know that our voltage in the United Kingdom is 230 volts. So, we take our Power (460) and divide it by our voltage (230) which give us 2 AMPS. This means that the fuse would need to be the next size up which would be a 3-amp fuse. A 3-amp fuse would typically be suitable for appliances up to 690 watts. A 5-amp fuse would typically be suitable for appliances up to 1150 watts and...A 13-amp fuse would typically be suitable for appliances up to 2990 watts.
I must stress!!!! It is vital to check the manufacturer’s instructions for your appliance because there are occasions when these rule-of-thumb calculations may NOT apply!
2) Can I replace the flexible cable for an appliance myself?
This is generally not recommended. There are a lot more things that can go wrong when replacing a flexible cable. Flexible cables come in all sorts of sizes and treatments. If you were to select the wrong type of flexible cable for your appliance then you could be invalidating the warranty on the appliance or even risking electrical fire. This kind of work would be best left to an appliance engineer or electrician that repairs appliances.
3) How much does a plug top typically cost?
At the time of writing, it is possible to pick up a plug top at a hardware store or electrical wholesaler for around £1.50. BS1362 fuses for these plug tops are typically sold in packs of 5 or more and range from around £2 to £4. An electrician would obviously charge a minimum labour cost for carrying out this task for you if you would prefer the work done by a professional.
4) What does a burnt plug socket mean?
There is another article written on this for you. It is available on our site HERE. There are also many other informative and interesting article on our site so feel free to look around. If you know what you are looking for but just need the information then check out the KNOWLEDGE CENTRE where you can search by keyword for the information you need.
Back to top6) Product Links
Earlier on I promised the links for each of the products, so here they are.
- The C.K side cutters
- The C.K Wire Strippers
- The C.K Modulo Screwdrivers
- The Wera Slotted Screwdriver
- Plug Top
- Mixed Fuses


